

This technique is born for those wishing to conquer complex riffs and play fast solos!
When compared to the directional picking or natural picking patterns, alternate picking will provide more precise phrasing, greater sustain and punchy tone as you are hitting every note with your plectrum.
In this article, we explain this technique and provide some useful exercises to get you started!
What is Alternative Picking
Before, we jump into the exercises lets first discuss the basics.
Alternate picking is an advanced guitar picking technique is popular technique which is popularly used among shredders. It best describes the motion of the picking hand, that uses a combination of alternating between down-strokes and up-strokes in sequence.
Basically, meaning when you pick it is always a strict DOWN UP, DOWN UP. Making sure you always keep this motion as you go along the neck and across the strings.
Important Aspects of Alternative Picking
The main idea for alternate picking is making sure all the picking strokes are even with similar picking dynamics so you a smooth even sound produced. The alternate picking technique was most challenging for myself as it requires a lot of concentration as you have to be mindful how the technique is executed to ensure you get a clean output and build the correct muscle memory!
There are many factors you need to balance to ensure the correct muscle memory. These include:
- Holding the pick – being mindful how the pick is held is also a consideration as holding the pick wrong will restrict your movement
- Picking Hand & Wrist Motion – the wrist motion is only applicable to the picking hand. It is the process of keeping an accurate UP / DOWN motion at a constant speed.
- Fretting the Notes – fretting the notes is very easy however you do need to be mindful of finger placement and thumb placement to just make things easier.
- Accuracy & Coordination – this is a problem people get very early on, and it just involved the synchronization between the picking hand and fretting individual notes
- Alternating Between Strings – when moving from strings can cause massive problems which you need to fix very early on in the learning process
- Theory & Picking Patterns – just hitting random notes never sounds good so it is required to learn some scales and shapes so you are in key
- Rhythm & Tempo – once you have found your rhythm all the practicing methods discussed will fall into place at higher picking speed. you can use Accents to emphasize certain notes helps keeping in time at high speeds to increase control
When first starting out using this technique it uses a lot of energy (both mental and physical) however, once you have built some muscle memory and learned some basic guitar theory it gets easier and becomes second nature! With the right learning process you will be amazed how fast you you improve.
These are the foundation of alternate picking. We will take you through each of these in detail and you’ll be amazed how fast your technique improves.…
1. Holding the Pick
How you hold the pick is relatively important for building a good technique. When first learning how to hold the pick there are a few things to be mindful of:
How to Grip the Pick
u grip the pick between your thumb index finger. It is better to position the pick so it leans towards the knuckle of your thumb, and the knuckle of your index finger. Ideally, it rest between both knuckles. The fingers you don’t use to grip the pick also play and important part. These will need to be tucked in so you are almost forming a fist. This will give you a better wrist motion (discussed later on).
Where to lean your palm
It is important to ensure you lean your palm on the bridge. More specifically, right at the position where the strings first connect to the bridge. This is so you can control how much palm mute to apply to dampen the strings slightly to get the desired tone. You want to find the position where you remove and apply palm mute with as little movement as possible.
There is no formal to how to hold the pick properly, it all lies down to whether which way comforts you the most. For example, you will see some guitarists such as Michelangelo Batio who does not follow the convention rules of pick holding techniques. helps you to deliver the music and tone and plays.
The Angle of the pick
There is some debate in the guitar community how to angle the pick as you strike the string, but there is no strict rule for this. However, what you will find is that if you strike the string at an angle the string will no resonate as well than if you strike in straight.
When i was first learning alternate picking i would always pick at an angle as i felt this was more natural but over time as i have built my skills i hitting the straight straight. It sounds cleaner and more precise in my opinion.
You can try to hold the pick at a forty-five degree angle to the strings to create sharper sounds. holding the pick parallel to the strings can also be helpful in the case you want your sound to be warmer or fuller
2. Picking Hand & Wrist Motion
When talking about wrist motion we are specifically speaking about the hand which you hold your pick. This hand will be moving in a strict Down / UP Picking motion.
- Down-strokes – By down-strokes we mean the note is played with a downward motion of the pick, towards the floor.
- Up-strokes – By up-strokes we mean the note is stuck with an upward motion, towards the ceiling.
Another way you may recognise this Down / UP motion is because it is similar to the of tremolo picking technique. Tremolo picking is a foundational element for learning alternative picking technique.
Tension Vs. No Tension
When you apply tension in your wrist you will notice the notes you play are more precise and clearly. However, you use more energy and cant keep those for long periods of time without straining yourself.
When you release tension you will notice the motion will flow better, but again the notes become more blurry, and can almost sound sloppy. Generally, it is better for keeping a relaxed wrist. But, tension in the wrist the amount of tension you apply can be used for practicing purposes. Just like working out at the gym, how do you build muscle? You lift heavy objects and your muscle tenses. The same logic applies to building muscle memory in your wrist.
When practicing i would apply tension to the notes i struggle to play then relax on the notes i am can play. Overall, it is better to play in a relax motion but but you can add a bit of tension to help you get past barriers. once you build the required muscle memory you will be able to sense the adjustments needed.
3. Fretting the Notes
When talking about fretting the notes we are talking specifically about the picking hand. This includes: proper finger placement, how hard to press to note, thumb position, curvature of the fingers, and wrist position.
- Finger placement – Whenever you press a note, the position needs to be as close to the fret-marker as possible.
- Pressure applied – not pressing down to hard as this can mess with the intonation of your guitar and make your sound out of tune slightly.
- Thumb position – the point of your thumb will always rest on the back on the guitar. There is no particular rule how your thumb rests, it is just there for additional support.
- Wrist position – The position of the wrist is also important to be mindful of as if you force your wrist into an unnatural position it can restrict the movement of the your fingers. The shape doesn’t want to be forced into being too straight or too flat. Remember the angle of the wrist is determined by the position of your thumb, and your thumb is only used to support to fretting the strings.
As you can see the technique for fretting notes the correct way is easy to learn, but it i hope it answered any doubts you may be having. Further, when you start playing faster you will find that your fingers lack strength, and lack the ability to move fast enough. You maybe struggling with this at first just like i was, but you will get better faster than you can imagine. My biggest pointer is not to sacrifice technique over speed as this will hinder you later down the line.
4. Accuracy & Coordination
As you have seen when learning alternative picking there is a lot to remember for each hand. When first learning this technique you may experience a slight difficulty when bringing both the the left and and right hand together.
The picking hand is by far the hardest hand to build technique.
This is because when you play at higher speeds you use a separate set of muscles in the wrist of your picking hand than when you play at slow speeds. Ironically, this means by practicing at slow tempo won’t build the muscle memory required to play at higher speeds. It is a bit like what came first the chicken or the egg.
The good news is there are secrets to overcoming this hurdle…
- Practice at slow motion – when first learning a new picking pattern practice it at slow tempo until you have it comfortably memorised.
- Practice fast in bursts – if you practice slow, this will not help you build speed. This is because when playing fast you naturally use a different set of muscles, so you cant build muscle memory. This means you need to practice at fast passe. Which is hard when you can’t already play fast. This is why you practice at short bursts to over come this dilemma.
- Accents – Do not underestimate this simple technique. By emphasising the beginning of the beat, as well as emphasising those notes you struggle with will help for build a better technique. Technically, the accent can be added where you please in relation to the timing you’re playing. But, if you’re starting out then realistically you want to accent to by the first note of each bar being played. You know your getting this correct because it will almost sound like a train effect.
- Alternate between large and small motion – Generally, when you are picking the best technique is to Keep the movements as small as possible as this improves accuracy. however, if you trying to play faster and are struggling with coordination you can use something i call the ‘rake technique‘. This is used specifically for improving the coordination between the motion between the picking hand and strumming hand. You will only do this for practicing purposes only as you sacrifice accuracy (making it not a permanent solution) but it does help build the motions required for playing at higher speeds. You will see this technique increases the movements when picking, to the point where it could appear you are almost strumming.
- Metronome – Playing to a metronome is essential as it will help you improve your timing. It’s perfectly natural to slowdown, speed up and misplace notes whilst you play. A metronome will help keep your notes perfectly even and in time. It can also help with speeding up and slowing down tempo.
- Record yourself and listen closely – by listening to yourself in a recording you can easily identify those dead notes or notes that are slightly out of time. Is it a good method to listen back at your recording and dissect where it is your going wrong. You can then use accenting technique to correct those timing issues.
When practicing it is important to use the above methods to build good technique. When learning the wrist motion the aim is to always strike notes consistently and continuously, with the exception of adding a clear accent (putting emphasis on a note). It is difficult to practice at high speeds when you cannot already play at those speeds. You overcome this This is why you will practice in bursts. Don’t rush this process, practice at both slow speeds and higher speeds to build up your skill. If you rush this process you will build bad technique, and this will seriously delay your learning process. Remember, good practice makes perfect!
5. Alternating Between Strings
Once you get the idea of how alternating picking works you will quickly realise how difficult it is to keep up a consistent tempo whilst changing strings. This requires heavily on practice and building the required muscle memory however there is one consideration that will make your life easier.
First, let’s define the terms “inside” and “outside” picking. It’s pretty easy to distinguish between the two concepts.
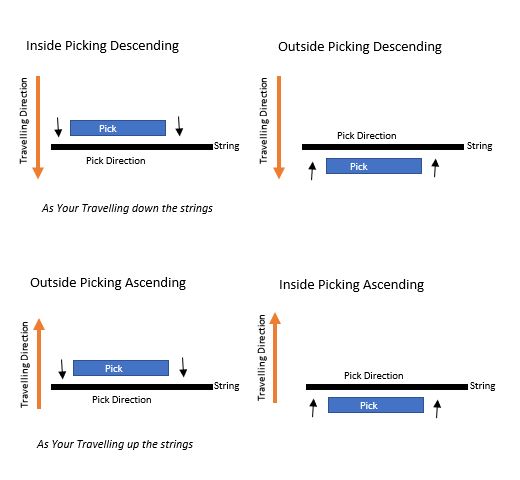
- Outside Picking – With the outside picking technique, it’s when you switch to a higher-pitched string after applying a downstroke, and changing to a lower-pitched string after an upstroke.
- Inside picking – technique, it’s a completely opposite movement. You should go to a lower string after performing a downstroke and move to a higher string after an upstroke.
When traveling down strings
planning your picking so when you get to the next string, you strike the note as a down pick. When always ttravelling down strings make sure that the first note you pick is always a downward stike.
This is because if your travelling down the strings and the next note is a UP-PICK you motion is flowing downward whilst picking up. Which can cause all types of problems.
When travelling up strings
When travelling up the strings opposite rule applies than when you are travelling down strings. This means when you are travelling up the strings you want the first note of each strings to be an UP-PICK.
Other wise you are applying a down ward motin whilst travelling upwards which makes it harder than it has to be.
Planning your picking pattern
When learning alternate picking planning your picking journey is incredibly important and will benefit you immencly in the long run. In fact, if you do not plan your journey youll never be as compatnent as the professionals, you missing notes and sound sloppy because you will easily get confused what notes you are playing.
This is mainly because you need to know every note your htting and which one of those notes, ensuring your travelling accuratly up and down the strings.
6. Theory & PICKING Patterns
In this section we discuss the different picking patterns used to pick up and down major & minor sclaes, pentatonics scales and even move diagolally across scales.
Exercise 1 – Moving up / down Chromatic
Using chromatic 4 finger exercise is one of the most basic exercises for learning alternate picking. The purpose of this exercise is to use four fingers per string, with the main idea how to move up and down through the strings, ensuring you place a separate finger on each fret.
The finger order would follow the order as shown below…
- your index finger would be placed on the 1st fret
- your middle for the 2nd,
- the ring for the 3rd
- the pinky for the 4th fret.
If you are moving down the strings from E A D G B E then start with your index finger. If you are moving up the strings from E G B D A E then start with your pinky. Always making sure your follow the alternative picking rule which is the notes that are plucked are in an even sequence of numbers. This is very important as it ensure you use the correct picking motion when changing strings.
In the case of this exercise our sequence of notes are 4 notes per strings.
Exercise 2 – Moving down/up Major Scales
Understanding how to move chromatially across the strings is relativly easy. However, when moving up and down major/minor scales things become increasingly complicated.
This is because the major/minor scales contain three notes per string. This does not add up to an even number which means every-time you change strings your alternating between your inside picking and outside picking. As discussed in section 7 you always want to stick to the inside picking method.
To do this you will have to play 4 notes per strings, as you would in the chromatic exercise. Or, 6 notes per string.
Moving down/up pentatonic scales
Two finger intervals are always used when moving up and down pentatonic scales. This is the typical method taught when specifically learning pentatonic as these scale contain two notes per string
The pentatonic scale is the one that all the guitarists can use for trying things like licks and riffs, melodies, and solos.
When trying two-notes per string patterns, you can start with either a downstroke or an upstroke. Don’t take this easily as two notes per string can be extremely challenging more than you expected it to be. Especially in executing at a faster rate, there will be less space and time for you to switch between strings.
Moving Across the Fret board
Things get way more interesting when you start moving across the fretboard.
Following the above rule (picking in even numbers) you can move across the fretboard and access more notes and thus extend your reach as you are moving diagonally through the scales.
As move through the scale this way the order of your fingers on the frets can be more flexible as by cross over your finger you are essential adding a 5th or even 6th finger by recycling a finger you have already used.
For example, the orders can be 1 -2-3 … 1-2-3 but the order of the notes will be E F G F G A.
This method is easier as you fingers have a more natural way of moving.
String Skipping
You can try one string skipping or even two string skipping which is when you decided to skip 2 strings every fret. And again, these exercises should be tried starting with both an upstroke and a downstroke. The effects that can be created with this string skipping thing is that unpredictable and ear-catching intervallic leaps can be interspersed with smaller steps.

You can simply imagine that if every single of your performance and sounds and tones or saying magic you create with your guitar is all by playing with a straight line only from this string to another one in a narrow interval, you are limiting yourself from creating even more exciting and stunning sounds from wider intervals like the sixths, sevenths, octaves and even higher. But in practice, a lot of effort will be needed in order to master this exercise. You should try to take things slowly and step by step, instead of feeling the pressure with the fast speed and then ruin the whole process.
7. Rhythm & Timing
Accenting the notes are really important as this really tightens up your picking by mentally locking you into the tempo. In the below video i discuss how you can use the rhythm of the rocky theme to build your rhythm for alternate picking.
By accenting notes will tighten up your picking for two reasons: It makes you subconsciously able to tap into the time signature, as well as highlighting the tempo. By adding accents you will find picking at higher speed will become easier. It acts on superficial way of tapping into your body clock.
Not only does accenting tighten up your playing it can also be used as a training exercise. Accenting can help in many way of practicing. For example, if you find that you are hitting a dead note in the lick you are playing, you can purposely over emphasize that note for practicing purposes and build the strength needed to correct a bad habit.
There are some common rhythms such as the eighth or sixteenth notes. For these rhythm picking patterns, there will be a specific pattern combining the downstroke and upstroke with them. For example, with the sixteenth notes, the first and the third sixteenth notes should be played applying the downstroke technique. And the upstrokes will be used for the second and fourth notes.
Once you find your rythm everything you have learned will just magically mould together
Conclusion
As discussed the alternative picking is a strict DOWN/UP motion, making it harder to skip between strings, and cannot be used for sweeping arpegios. But on the other hand, direct picking can allow guitarists to play faster across the fretboard and very helpful for playing riffs. So it is up to you where you think is best to use.
The alternate picking outweighs the direct picking technique for playing faster. However, the worst thing to do it just using it for the sake of playing using it. If it doesn’t agree with perceived the note choice then you might want switch out of the technique for the rest of the riff.
The alternate picking technique is said to be quite challenging when it comes to the very first steps of trying to figure about it. You need to practice a lot, definitely, but it will be worth all the efforts being spent. Of course you need a lot of time to get to that point where all your fingers are stretched enough to do so.