
Do you know the truss rod can help change the angle of your guitar neck? Without a truss rod, you have no control over the tension on the guitar neck, and so with it, you can make careful adjustments that increase the life of your guitar!
How to Adjust the Truss Rod? To adjust the truss rod on the guitar you will:
- Evaluate the current setup
- decide which adjustments need to be made
- correcting a bow
- correcting an upbow
- retune
- intonate if needed
In this article, we will go over how to properly alter your truss rod for the best performance. Let’s get started!
1. What is a Truss Rod?
Before, I take you through how to adjust the truss rod on your guitar. First, let’s look at some basics!
The truss rod on a guitar is described as a long and thin metal bar running along the length of your guitar neck and positioned under the fretboard! It is usually made from iron, steel, or even graphite.
So you might wonder how you can get access to this piece when it is lying underneath your guitar’s neck?
You can access it either from the nut or the heel. Actually, there will be a small hole placed behind the nut where a small piece of wood covers and screws to hold down.
2. How Can it Help You!
To begin with, a guitar truss rod is, in fact, pretty important to every single guitar.
There is tremendous tension on the guitar neck. This caused by the guitar’s strings, whereby the neck could be prone to breaking easily.
The truss rod is invented to stabilize and take the tension of the neck so that you can create subtle angles of the neck making the guitar easier to play.
Understanding its mechanisms will help you to achieve a better set up so that your guitar is easier to play for both electric and acoustic.
3. Common Problems!
Don’t forget to include the environmental factors such as the weather and how your guitar surfaces and materials respond to the changes of nature to the list of reasons why you definitely need to learn how to adjust the truss rod for better preparations.
As the strings are attached to the top of the neck, means there is pressure that comes down to the neck.
This can lead to the neck bending or in some extreme cases even breaking due to the tension.
Even though the truss rod takes away the tension it may not be set up properly to provide full protection against the wood of the neck.
It is also to see your neck starting to bow. This will lead to the situation where the gap between the 12th fret and the string will get greater (increasing the action).
When this happens it will alter the tension of the strings, which then causes problems with intonation. You may even start to notice dead frets and buzzing when you play.
If you start to notice this then you urgently need to correct the bow angle in a guitar’s neck, recommended to straighten it.
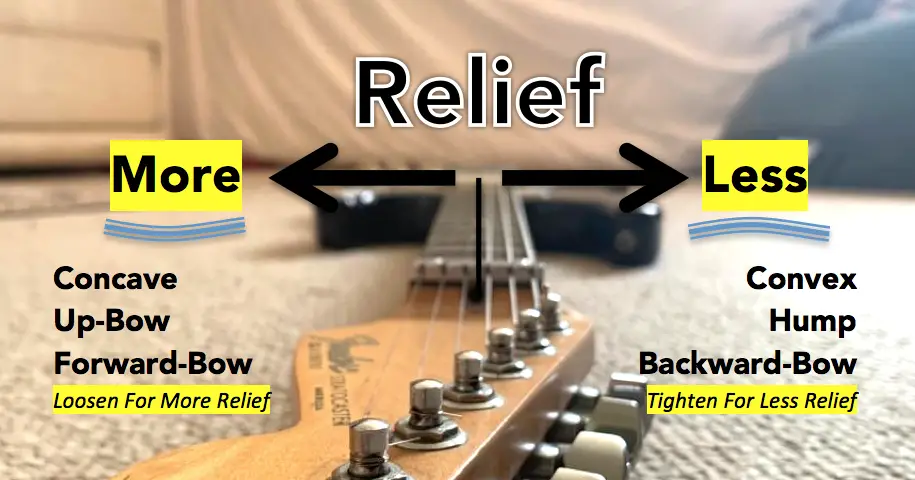
4. Positions of the Neck – Bow Vs. Relief
We have discussed the action from above, now let’s move to terminologies used to describe the angle of the guitar neck.
There will be two cases that could happen when you try to adjust the relief. Forward bow or Backward bow.
- Forwards bow – Upbow, concave, Relief, High action.
- Backward bow – Convex, Low action.
These terminologies are important for when we go through the process of altering the truss rod.
Backward Bow
When you visualize a bow you imagine a D shape. Imagine that the curved bit is the Neck and the straight bit is the strings. You will notice, what a backward bow means is when the neck straightens and curves back on itself.
The neck naturally straightens this way when the tension is reduced, and because of the truss rod pulling against the strings, you will find the guitar neck naturally creating a convex shape.
Naturally, this will reduce the distance between the neck and the frets creating a low action.
Forward Bow
Again, if you visualize a bow you imagine a D shape. You will notice, what a forward bow means is when the neck and the strings form a Bow shape.
People call this bowed, or upbow as it is visualized as a bow. Also, it is called to adding relief.
The forward bow is where you have a loose truss rod and it bends up the nut, giving silly high action.
You bow the neck upward (Up-bow) by adding relief. By doing this the strings now become further from the neck, creating a high action.
Space therefore will also increase, creating a cave, or concave shape appearance, lowering the possibilities of causing buzzing.
But remember that if you depend on this technique too much by keeping adding more and more relief, it will turn out to be a whole lot difficult to play due to the compromised intonation.
However, you should not be worried too much about the perfect adjustment for the relief. It somehow also depends on your own playing style so that you can pick out the most suitable angles and adjustments for your guitar’s neck.
5. How to adjust your truss rod for a setup?
So this is the most important section in the article: How to adjust the truss rod without damaging anything to your guitar?
This will include:
- Evaluate the current setup
- Decide which adjustments need to be made
- Correcting a bow
- Correcting an upbow
- Retune
- Intonate if needed
let us go through each of these below…
6. Evaluate the Current Setup
It’s essential to check the current bow in your guitar’s neck!
Of course, you need to take a look at the current position of the neck, whether it is straight, dipped, or over-bent.
Usually, you get the problem on the neck when it is Bowed. This is because the wood of the neck cant take the tension and starts to bend in the middle.
However, if you are doing a setup and want to gain better action then you will look towards creating a back bow as this will lower the action.
7. Decide Which adjustments need to be made
So here you will decide how you will adjust the truss rod to improve the situation.
- is the neck bowed – in this case, the truss rod will need loosening to release the tension and create parallelism from the strings to the fretboard
- is the action too high – if the action is high you will want to create more of a backbow which will lower the action.
- is the action low – if the action is too low and the frets are buzzing you will then want to create a forwardbow.
Once detecting where the problem is, you need to find the suitable solution to it. There are usually only two directions for adjusting the truss rod: to correct a backbow or upbow.
8. Correcting a Backbow
Before making any adjustments you want to loosen your strings.
You can then begin to correct a Backbow by tightening the truss rod. You will be able to tighten the truss rod by turning the truss rod nut clockwise.
This will reduce the amount of relief.
In this scenario, the bow is now quite large caused by increasing tension and pressure from the guitar strings.
Therefore, the truss rod will need to be tightened to compensate for what the neck has to suffer.
Extra pull away from the strings will be generated.
9. Correcting an Upbow
The second possible case is when you would prefer to add relief to the neck.
This happens when you feel like you’ve been through some bad experiences involving buzzing frets.
The truss rod now needs to be loosened, which will allow the strings to create more pull on the neck. The next step is to turn your truss rod tool anti-clockwise.
For the frets buzz, if it’s in the lower parts, let’s say from the 7th fret, then definitely it needs to be loosened to generate more relief since there’s not enough of it. But if it falls into the cases of higher frets, from above the 12th positions, you will only need a slightly more relief by loosening the truss rod or maybe raise the action a little bit.
One thing you definitely need to pay attention to, after loosening the truss rod, is to check your guitar tone. If there are signs of dropping in tuning after the adjustment, then you know that it won’t be necessary to loosen your guitar strings before making adjustments to the truss rod.
10. Re-tuning
Retuning is an important steps and be patient to wait for the results.
Always remember to constantly re-tuning your guitar to properly check your adjustments.
Some of the useful notes to keep in mind:
In the middle of trying to turn the truss rod and you feel like it’s stuck or won’t keep moving at all, then you should stop. Don’t be stubborn since the truss rod may be at its limit already.
Truss rod access can be found at the headstock and heel ends of the neck.
A large crosshead screwdriver and an allen key or socket wrench will be needed for the adjustments, but you should research carefully the most suitable wrench for your guitars to avoid any damages. Different sizes of the wrench will apply to different guitar models.
11. Intonation
We have mentioned the action and relief separately quite detailed enough from above, now let’s look more into the intonation and its relationship with the relief.
Firstly, intonation refers to the idea of how your guitar is in tune, and most importantly whether it is out-of-tune. And unfortunately, your adjustments to the truss rod can affect the intonation of your guitar.
We will examine this example for further understanding. If you currently have your guitar bowed forward (high level of relief), which means the distance between the strings and the fretboards is large generating extra pressure on the strings. Now try to play the 12th note, as you will have to put more pressure on the strings, more tension, to play this note since this part is staying above the part where it bends the most. Leading to an out-of-tone situation. But let’s get back to the lower fretted notes, on the 5th or 6th strings, it will sound in tune better. So in this case, the more you try to move up alongside the fretboard, the higher possibility of the notes being out-of-tune.
This can be improved if you try applying a slight relief in the neck, creating lower action in the higher fretted strings, with better intonation as a result.
Conclusion
Its functions don’t just stop there. When you mention the truss rod, it usually comes along with the other three things, including relief, action, and intonation also.
With some of the previous pieces of information, you can now somehow have a clearer view of how crucial the truss rod is.