
Have you come accross problems with your guitar while playing? The concept of the ‘guitar setup’ sounds complicated but it is actually quite simple once you know what you are doing!
How to do a guitar setup? You setup guitar by ensuring all the components are working to their full potential! This procedure includes calibrating: the Action, Intonation, bridge, nut and tuning heads to the desired tuning, ensuring the electrics are cleaned and fully functional. Whilst matching your preference of strings!
In this article, we will cover EVERY step in detail… SO let us get started!
1. What is a Guitar Set Up?
A guitar setup is considered to be “basic maintenance” for the guitar.
This procedure involves mainly three parts: the neck, the nut, and the saddle. Moreover, things like matching your preference of strings or pickups and also being well-prepared right at the very first steps.
2. Why is a Guitar Setup Important?
We all know that over time, your guitar must undergo a lot of stress from the environment (seasonal changes) as well as the constant tension the guitar is under!
This can eventually lead to high or stiff action, buzzing frets, dead notes, poor tuning, and intonation.
These can really be big obstacles destroying your experience with the guitar. So a proper setup process will essentially make your guitar new again!
3. Tools Needed To Setup Your Guitar?
The first step towards setting up your guitar is having the right tools!
So, there are different tools that are suitable for each part of the instrument.
- Screwdriver – You will need a screwdriver set, as guitars can vary but the most common fitting will include a Phillips/Pozi drive 1.5mm. This will be for adjusting the pickups and access to the scratchplate and machine heads
- Truss Rod Wrench – you will also need either Truss rod Wrench or a spanner set / adjustable spanner for altering the Truss Rod
- Allen Key – you will also need an Allen key set for altering the intonation on the bridge
- Work Bench – you will need a solid surface to work on such as a workbench
- Neck Rest – a neck rest is not crucial but it does make working on it easier. Otherwise, you can use and fold up towels/cousins or anything else spongy
- Chromatic tuner – any old tuner will work fine however I use chromatic tuners because I find them better to work with especially when intonating the bridge
- Wire cutters – you will need wire cutters to cut the strings away from the headstock
- Machinists ruler – to measure the action between the strings and the fretboard
4. Setting up the Neck – Truss Rod!
Guitar necks bend and from years of tension, the guitar neck may alter slightly becoming bowed (higher action) which can warp the neck or create buzzing when fretting.
A truss rod is used to control the angle of the neck. It is a long and thin metal bar running along the length of your guitar. It lays alongside your guitar’s neck, from the nut to the heel. And its position is under the fretboard. And for its function, a truss rod is invented to stabilize and lower the tension caused by the guitar’s strings on the neck of the guitar.
Angles of the guitar neck
The BEST way to depict the angel of the fretboard is referring to the angle of the guitar neck! for example, high action is measured by a longer distance between the guitar strings and the 12th fret on the fretboard. Whilst low action is determined with a shorter distance between the guitar strings and the fretboard.
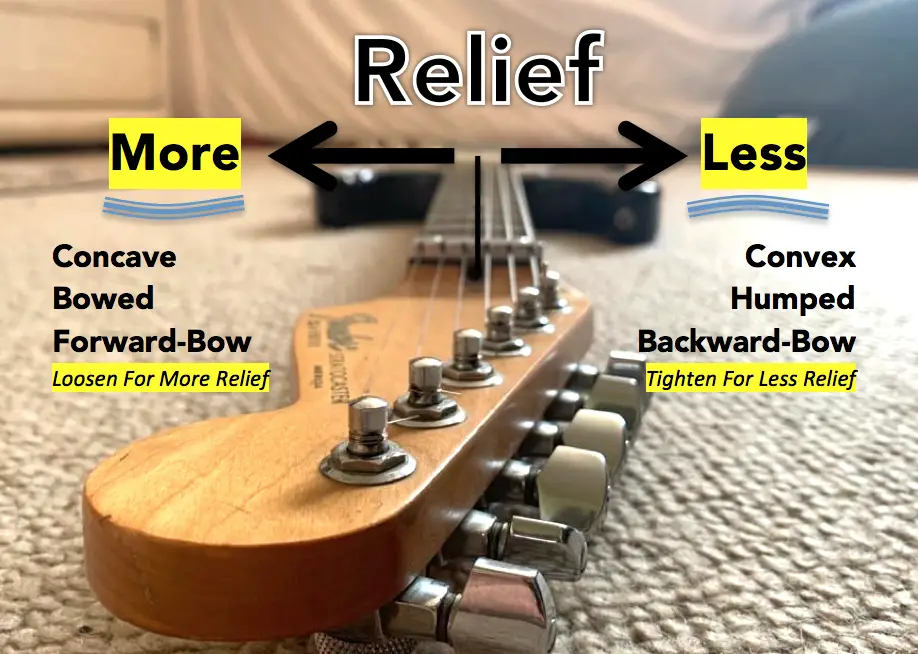
Usually, the guitar neck has three angles:
- Forward bow/Upbow basically, means low action
- Back bow/bowed basically means high action
- Straight neck
Without the truss rod, over time, there will come the moment when your neck starts to bow leading to the situation in which your strings will tend to come apart from the fretboards (the action) and you will find it difficult to adjust or play any strings.
Altering the Truss Rod!
The idea of altering the truss rod is to keep the initial shape but want to aim to get the Action as low as possible without the strings touching the fretboard. But, also keep the strings parallel to the fretboard.
When the strings touch the fretboard You will hear a buzzing sound meaning you have gone too far and you will need to add relief (basically bowing the neck – increasing the action).
- Correcting a back bow (when action is high): When the Action is quite large. It could be because never been set up correctly, or increased tension and pressure from the guitar strings. Therefore, the truss rod will need to be tightened to align the strings parallel to the fretboard from the 12th fret. You will be able to tighten the truss rod by turning the truss rod nut clockwise.
- Correcting an up bow (when action is low): When the action is to low and the fret are touching the string then the truss rod now needs to be loosened. This will allow the strings to create more pull on the neck. You do this by turning your truss rod nut anti-clockwise.
If the neck is set up correctly you will have no problem during playing and the strings will vibrate freely not hitting any of the frets whilst the action is still low. In addition, if your truss rod is in the right position and there’s no need to try changing it.
5. Adjusting the Bridge Height
Why should we consider adjusting the bridge height? So, after you have set the guitar neck and are happy that both the strings and fretboard are parallel to the fretboard we can then move on improving the action.
The Bridge is one of two points where we alter the height of the action. In order to adjust the height of the bridge, for the guitar, you need to adjust the saddle (this is where the strings rest on the body end of the guitar).
On the electric guitar, we will alter the vertical screws and on the acoustic guitar, this will involved shaving down the saddle.
Try using a machinist’s ruler. For the top three strings, 3/64ths inch (nearly 1,2 mm) is considered to be low action. Usually, the standard gap between the low E string (sixth string) and the 12th fret is 2mm.
Electric guitar Bridge height
By raising or lowering the bridge’s vertical screw, you can adjust the guitar strings. Now, the action can be adjusted depending on the distance between the strings and the top of the 12th fret. You might be wondering how to precisely measure the exact distance between the strings and the top 12th fret.
Acoustic Guitar Bridge Height
On the acoustic guitar to alter the height you need to shave down the saddle.
This means if the action is low and needs to be higher the process will include replacing the whole saddle. However, this should only need to be done in very extreme circumstances.
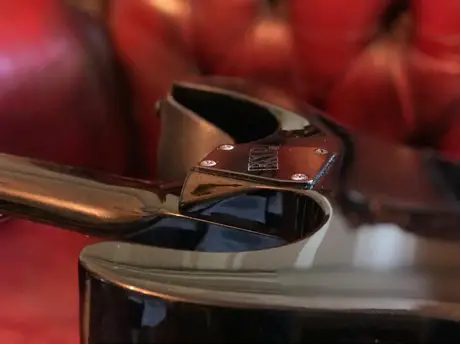
6. Adjusting the Guitar Nut
A guitar nut is located at the point where the headstock meets the fingerboard, it is also used for holding the guitar strings.
A guitar nut that needs fixing can put you through the experience of buzzing noise. For example, if the string is being placed too low in the slot, it can lead to fret buzz.
So what are the options to fix this?
The whole process is not gonna be easy as you obviously first need to remove all the strings to take away the guitar nut. Something sharp like a blade or a knife will come in handy when trying to score the old guitar nut.
Reduce the height of the nut
To reduce the height of the nut the tool you will be using is nut files, shim stock, or X-Acto knife.
You can then reduce the height.
However, becarefully to only take small portion off at once as there is really no going back.
Increase the height of the nut
You can choose to raise the guitar nut by adding bone and glue. However, this method is very problematic and it is better to actually replace the nut.
It is very rare that the nut needs to reduce in height. Usually, it is at the correct height or requires removing some of the height.
7. Set the Intonation
So once you are happy with the height of the strings, the parallelism of the strings against the fretboard, and the action you can now move on intonating.
By intonating, you will iron out those dead frets on the fretboard.
How to Identify Dead Frets
When every string sounds to be at the correct pitch for each fret along the fretboard.
A common method is to check that the 12th harmonic note matches the open note. Now, for the first step, you need to play each string at the 12th fret. Compare with the electronic tuner, the result should turn out to be the same as the open string. For example, when you try the 6th string, low E, next up press the 12th fret note and pluck the 6th unfretted note again. If the screen of the chromatic tuner displaying the note E also, then your intonation is in good condition.
Adjusting Intonation
If need be you can make changes to this by increasing or decreasing the string’s length. We can then use a chromatic electronic tuner in this checking process. For the situations where the string’s length needs to be fixed.
- If the fretted note is sharp compared to the open one, then try adjusting the saddle on the bridge back towards the tailpiece.
- If the fretted note is sharp then move the saddle forward towards the neck.
In the end, you don’t want one sharp note to ruin your performance, as this can be really annoying to some people. Always remember to check the pitch of all the strings until the intonation is correct.
8. Brand New Strings
Brand new strings can help deliver the best quality to your guitar intonation and resonance.
According to the standard EADGBE tuning, you can use a string gauge from 0.9 to 0.11.
Gauge
It is also good to keep in mind that lighter the strings have less tension. For those strings with a higher gauge, lets say gsuge 13 may overwhelm and damage your guitar neck. In the meantime, a set of 0.9 is considered to be extremely light, easier for bending the strings. And since they are lighter, you also don’t need to apply too much pressure to press it down.
Intonation
In addition, depending which gauge you decide to choose you will have to compensate when going through the intonation process.
This is to ensure the guitar supports the tension of the strings.
Chaging the strings
The strings will slip through the bridge and be held in place with the string tension on the ball end of the string which goes into the bridge and then weave the other end (opposite to the ball) through the machine head.
The tool that you should use for this step you will use the string reel to tighten the strings and heavy-duty wire cutters to cut the string back at the headstock.
Conclusion
I’ve mentioned in the introduction that a basic guitar setup mainly involves the neck, the nut, and the saddle.