
Did you know that even though the Nut is one of the smallest components on a guitar, it also shapes your tone?
This is because the Nut is one of two paths where the vibrations travel from a string being plucked towards other resonators such as the headstock, neck, and body. This means if you are having problems with your Nut then it could be limiting the potential of your instrument.
How to repair your guitar nut? There is a simple process you can follow to change your own guitar nut at home.
In this article, we’ll discuss guitar nut maintenance and answer many questions people have.
1. GUITAR NUT BASICS
Just so we are on the same page let’s just explain some basics about what a guitar nut actually does.
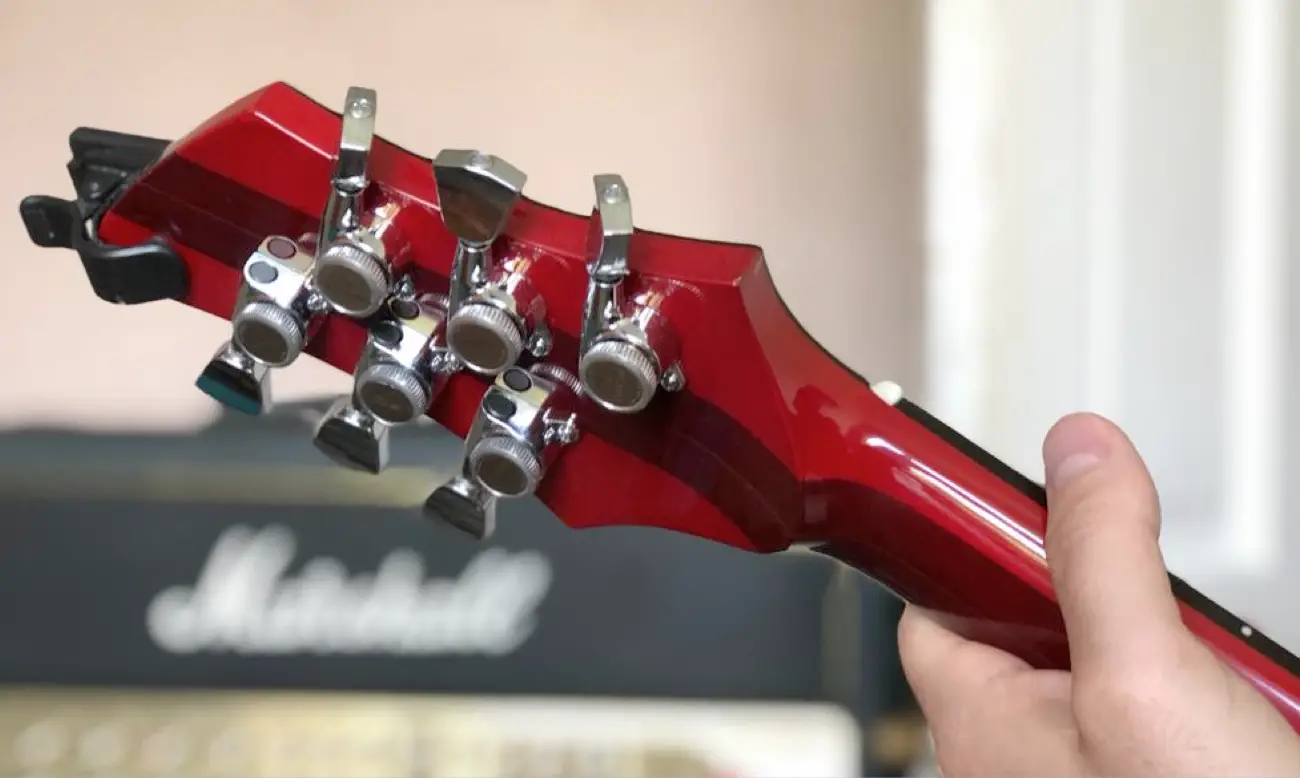
WHAT IS A GUITAR NUT?
A guitar nut is a small piece of hard material that lies at the end of the fretboard closest to the headstock.
A nut can be made of a variety of different materials, depending on which one is gonna suit your style and needs, from bone, ivory, tusk, wood, metal, and Tusq,…The material is also one important thing to consider when selecting a guitar nut since its density can contribute greatly to how it works in transferring the vibrations.
WHY IS A GUITAR NUT IMPORTANT?
The guitar nut’s main function is to control the spacing between the strings and the height at which the strings are held away from the fretboard.
However, because of its crucial location, the guitar nut consequently also shapes the tone of the instrument.
It also transfers the vibrations made by the string to create sound.
2. GUITAR NUT, POTENTIAL PROBLEMS!
There are FOUR main problems when it comes to having your Nut serviced. These are as follows:
- Loose Nut
- Height of Nut
- Depth of the String slots
- Warn Slots
I will talk a little bit about these below…
LOOSE NUT
A loose nut is probably the most common type of problem on a guitar. Luckily, this problem can be fixed without purchasing a completely new nut, saving both money and value if the guitar in question is collectible.
This is because collectible guitar keeps their value if they still contain their original components.
For this reason, it is essential to try and reuse the old nut whenever possible. However, we may not always be this lucky.
HEIGHT OF THE NUT
It will be quite hard for you to control and bring a bad experience in playing your favorite guitar if the nut slots are either too high or too low.
A nut slot that is too high can cause intonation and throw off the tuning. On the other hand, one that is too low can lead to a “sitar” effect – when the string can’t clear the first fret, creating a string buzz.
So you may be wondering, then how can you know at which height it will suit the best to your guitar?
The truth is that there’s no right or wrong answer. However, the general consensus is that you want it as low as possible without the strings buzzing or interfering with dead frets.
DEPTH OF THE STRING SLOTS
The depth of the string slot is an uncommon problem. Usually, this refers to the space where the strings sit on.
Ideally, there should be room for vibrations without affecting the first fret or else it can lead to open string buzz and sharpen intonation.
You don’t want the strings sitting too deep and so the only way to fix this is by filing the top of the nut down so it gets rid of any overhang (discuss this in more detail later on).
WARN SLOTS
Worn slots can appear after a long time using the current guitar nuts, it can lead to irritating buzz on the open strings and cause a loss in tone, which is very annoying and frustrating.
The first thing you need to do is identify which string slots are in bad condition, then you may be able to clean them up with a file and then use Vaseline to lubricate the nut slightly.
3. EVALUATE THE NUT FOR REPAIR
This is our main focus as mentioned above that there will be a time when your guitar nut is worn out and affects the quality of sounds created by vibrations and it keeps “buzzing”. Replacing the guitar nut is also the first option that you can think of when there’s something wrong with the performance of your guitar since it’s actually quite a simple and inexpensive fix.
REPAIRING THE NUT
When evaluating the Nut the first thing we must consider is whether or not it can be repaired.
REPLACING THE GUITAR NUT:
For ease of understanding, this is the moment when you decide that your “guitar nut” is too broken to be fixed or you have made up your mind that instead of repairing it and then keep worrying about whether it continues to wear out and generate poor sound, replacing it with a brand new one seems to be a safer and more convenient choice. Especially for those who have tried to fix it countless times, but there are still some problems with the guitar sound’s sustainability, constantly out of tune or your intonation being off for a while.
4. COSTS TO REPAIR GUITAR NUT
If you are able to salvage your nut then it will obviously reduce the cost of repair because you don’t have to purchase a new one.
However, you will still need some tools.
COST OF TOOLS
You will need any basic tools to repair your guitar.
Firstly, you will need a File and some wood glue.
NUTS OPTIONS AND COSTS:
- Bone guitar nut – So bone is the most common and “traditional” type of material that you can pick to make your guitar nut. One big advantage is that due to its material, this little thing will not be worn out for a while during tuning and even if you are a fan of tremolo dive bombs. The sounds and tones that it creates is extremely bright, resonant, also bringing lively effects to the audience. A bone guitar nut sometimes is treated as the best type, appearing in many high-end guitars on the market.
- Ivory guitar nut – This material has many things in common when compared to “bone”. Through this nut, the sound and tone can turn out to be brighter, also a little harder.
- Metal guitar nut – We all know that any type of guitar nut, it all requires maintenance and replacement when it is worn out. With metal, the biggest advantage is that it helps the durability of this guitar nut to last longer than the others. You won’t have to worry too much about when to replace the guitar nut.
- Tusq guitar nut – “Tusq” is actually a guitar nut that is made from plastic (100% organic polymers). This one is not a very popular one with many guitarists due to its poor sound properties, however, the price that comes along is pretty affordable. In general, the Tusq guitar nut delivers a rich tone with a significant increase in harmonics and helps add richness to your tone.
6. REMOVE THE OLD GUITAR NUT
Once you have evaluated the Nut and decided to either replace the nut or resotre an old nut you will then need to remove the old nut.
Firstly, in order to get rid of your old guitar nut, you need to remove your guitar strings since this is the “obstacle” that is placed right in front of your guitar nut.
REMOVE THE GUITAR STRINGS:
Take a look at the tuning key, then start to adjust it by keeping turning it until you can feel the tension while touching the strings loosen little by little for each one. Once it is completely loose ready for removal, pull the string out of the tuning post.
At the endpoint of the strings at the bright pins, you can use the built-in notch to slowly remove each pin, once it is pulled out, start removing the strings from the bridge.
HEAT UP THE GLUE
Now, if you notice, the only thing that keeps the guitar nut attached to the neck is a small amount of glue. This is the hard part: How to gently take it out without hurting or cutting into the instrument, your guitar, leaving ugly scratches on it. Also before that, the string tension is considered to be the important factor putting pressure on the guitar nut and holding it onto the neck.
Now the ideal scenario that everyone would love to see is that your guitar nut is already loose and can be easily cut off, also placing cleanly in the right angle slot. For example, some types of guitars like acoustic, electric, North American, or offshore have guitar nuts that sit at the right angle. But in other cases such as Fender or Gibson nuts, these usually require more sophisticated moves and patience to remove since they sit at a square U-shape spot.
USE A SMALL BLADE TO HELP EASE THE NUT OUT OF PLACE
But we all know things might not be that easy, the guitar nut itself can be a little bit “stubborn” at times, more efforts are demanded to extract the nut. There is a wide selection of tools to choose from when it comes to knocking the nut loose. From a small blade, a hammer, a sharp knife, larger screwdrivers,… feel free to pick any of these, it all depends on which one you refer to with the least possibility of chipping around the surface of your guitar.
A small blade can be used to score around the nut sides and then lift it off gently. Or tapping a hammer carefully on every side of the nut for it to loosen gradually. Remember every movement needs to be as gentle as possible and slowly a little bit at a time to avoid too much pressure inducing scratches on vintage instruments. Don’t worry if you think that the guitar nut is sticking into the surface and gentle movements are not enough to pull it out, let the vibrations finish the work then. Also remember the suggested direction is to cut the guitar nut away from the headstock, instead of towards it. In other circumstances, a sharp knife can also be used to score and trace the finish around the edges while at the same time avoid chipping.
If you feel that a hammer sounds too “violent” just for pulling off a guitar nut, then lighter tools like a screwdriver or a pair of end nippers will reduce the amount of pressure and force that you put on the surface trying to remove it. Using the screwdriver against the nut on the fretboard side combines with a pair of end nippers to pull the nut up more easily. The more fitted a guitar nut is, the harder it is to remove it. Once again, always remember to process this step with patience.
However, for specific cases like the example of Fender type instruments as mentioned above, with the U-shape spot, those tools won’t seem to come in handy. Then you need to try a different approach – try splitting it with a saw to remove it. Recommendations for a fine saw are the Exacto Precision Saw or Japanese Razor Saw. The guitar nut needs to be cut into half, and yes this will totally destroy your old one. If you intend to replace it with a new one anyway then this doesn’t really matter. But don’t forget to keep the fragments to help mark the original string spacing afterward.
7. RESTORING THE OLD NUT
Instead of replacing a brand new one, trying to repair it is also one of the first options to think of
If all this process is quite “complicated” to you, then maybe try to repair it before buying a new one. Sometimes, maybe the issues caused by your poor-performing guitar nut are not that severe, if it has not been completely worn out it may just need a little adjustment and everything will go back to its usual function.
REFITTING A LOOSE GUITAR NUT
Maybe all you need to do is fix and test whether the guitar nut is a little bit loose and has slipped, this can happen due to the nature of wood being easily dried out during some seasonal changes.
First things first, remove and set aside the strings to get access to your guitar nut. Once again, always remember to be gentle in every movement to avoid scratches and chipping. Check if there is any excess glue in the slot and clean it up. Center the nuts nicely, then put some drops of high-quality wood glue in the bottom, apply some pressure on it and wait until the little bit of liquid does the work, and stick the nut properly in its place.
REPAIRING WORN SLOTS
Worn slots can appear after a long time using the current guitar nuts, it can lead to irritating buzz on the open strings and cause a loss in tone, which is very annoying and frustrating.
The first thing you need to do is identify which string slots are in bad condition, then remove them one by one. Then use one of the tools that can help to cut and clean out the old slots, like nut files, a hacksaw blade, or X-acto saw blade.
Use the Krazy Glue or any other brands that bring high quality for wood surfaces, carefully drop some of it onto the cleaned slot. Now, the next step requires you to act fast since the glue can dry up pretty quickly, hesitation can cause failure. Take your new material to fill in (this material depends on which you choose, maybe baking soda or the original material that the nut is made of) the slot which already has glue in it.
Applying the same steps for the other worn-out slots. For any excess material that was dropped out during the whole process, you can scrape it away.
8. INSTALL A NEW GUITAR NUT:
CLEANING THE EMPTY SLOTS FIRST BEFORE PUTTING ON A NEW GUITAR NUT
You might not notice this, but currently, on the market, there are many types of specialty tools for cleaning the nut slot. A sharp ¼” chisel or a small mill file can do a ton of help to clean up the mess, the glue left over, sticking hard on the slots.
After removing your old broken, worn-out guitar nut, it is time to place a new one into that empty hole. These days, on the market, there are many pre-slotted and shaped guitar nuts for installation on different instruments. But these pre-cut nuts are usually “oversized” when you try to put them in. Adjustments for both the nut and the slot itself are necessary to replace a new guitar nut without causing any more trouble, like buzzing.
For example, the slots need to be filed to guarantee a suitable width and depth, in order to create a correct string height. You can use the “nut files” which are designed specifically just for cutting and squaring the nut slots, getting tight into the right angles. You should not try other tools that might ruin the nut.
The thickness of the pre-cut nuts also should be adjusted if you want to drop it into the slot and fit perfectly. If the nut is too long compared to the slots and its end leaves off the fretboard, then you can use sandpaper to shorten it to the matched length, until you are satisfied with the height. You should do this on a completely flat surface, remember to rub from the front surface of the nut to remove the material, or else you might risk ruining the nice curve shape from top to back if trying to remove material from the back.
One good piece of advice is that you should always double-check the processed nut with the slots on your guitar, how well it fits after being rubbed, be careful or you might over-cut it. Another thing is that the front face should be kept at the right angles compared to the nut bottom. It is also very important to maintain the nut bottom at 90 degrees square to the front edge for easily fitting into the slot.
Choosing the right glue type for your guitar nut is essential to help to stick it tight on the surface. You should pick the prestige wood glue brand that is heavy duty and is long-lasting but won’t damage the guitar. But try not to apply glue that could be hard for you in the future to remove, in case you want to replace another guitar nut.
9. ADJUSTING THE STRING HEIGHT IS ALSO VERY CRUCIAL
The information mentioned above are just the basic steps in general, things like adjusting the nut slots or setting up the new guitar nut are quite common and not detailed enough. You might be wondering, what does it mean by adjusting the nut slots. So it consists of the nut slot depths, their slot widths, and angles. These will help to complete the whole set up process and guarantee the cut is performed perfectly. For example, the heights of your nut can affect significantly the overall string angles since it depends on the string height at the bridge.
THE NUT HEIGHT ACTUALLY DOES MATTER A LOT, THINGS CAN GO WRONG IF IT IS TOO HIGH OR TOO LOW
It will be quite hard for you to control and brings a bad experience in playing your favorite guitar if the nut slots are too high. A nut slot that is too high can cause intonation and throw off the tuning. On the other hand, one that is too low can lead to a “sitar” effect – when the string can’t clear the first fret, creating a string buzz. So you may be wondering, then how can you know at which height it will suit the best to your guitar? The truth is that there’s no exact or one fixed answer to this. It lies on the guitarists’ subjective opinions and needs, some would want the slots to be a little higher and some prefer it to be as low as possible.
You can then keep testing many positions that fit your style the best by using a feeler gauge in between the top of the first fret and the bottom of the string too. And the guitar needs to be up to pitch. For example, if the result turns out that there is still extra space in between, then the slot is currently pretty high and needs to be lowered a bit to the point where the string slightly touches the top of the gauge.
(Brief explanation about a feeler gauge: A feeler gauge will help measure your strings’ thickness, define your tone, and most importantly to estimate the height of your string over the first fret. About the guitar string gauge itself, it refers to the thickness of your string lying on the level of tension and pressure you can feel when playing a string, also the tone that the strings produce. The lighter level of gauge strings obviously creates a thinner sound. While with the heavier level, you can immediately notice the difference with your fingers playing the strings, bringing a richer, thicker tone.)
10. CUTTING THE CORRECT NUT SLOT WIDTH
The slot widths can determine the level of string gauges that you apply to each nut slot. The most effective adjustment when it comes to the nut slot width is that you would want to have it a little wider than the actual strings, in that way the slot won’t choke the strings and cause tuning problems. For example, if you feel that the strings were being bound by the slots, then try widening the nut slots by 0.003” compared to the string width.
Another case is when you wish to raise your string gauges to a higher level to 11”s maybe increasing in string diameter, then the nut slots will definitely need to be widened also.
THE NUT SLOT DEPTH
Actually, this one was mentioned a bit above, in the nut slot height part. Basically, this refers to the space between the string and the first fret, how close it is, and the recommended distance for them. There should be room for vibrations without affecting the first fret or else it can lead to open string buzz and sharpen intonation.
CUTTING THE ANGLE
The last factor that you should keep an eye on when installing a new guitar nut is how you cut it and the angle that comes within, which is determined by the string pull of the headstock. For instance, if the angle is too steep, which means leaving the strings resting on just a small portion of the slot, then this can cause premature fret wear – a situation in which the shape of the frets is worn out due to the friction between them caused by pressing the strings against the frets.
Remember to keep in mind that during cutting the nut slot, the file in the slot should always be placed towards the corresponding tuning key.
Now, these examples should be easier for imaging how this step works, with a Gibson, since it has a tilt-back headstock design, then the file should be directed with a slightly downward angle that matches perfectly to the headstock pitch. And at the front of the nut will be the highest point of the slot.
While with a Fender guitar, which has a straight string pull, the guitar nut, in this case, shall be cut straight and in-line with the tuners. So there won’t be any break angle, because doing so can generate a string buzz on the open notes due to the Fender’s scooped headstock design.